So you already know how to connect to the LAN, but sometimes the Router is not right next to the Raspberry Pi and you need a wireless connection. Not every WLAN stick is compatible, check the compatibility list before you buy one. I am using a TP-LINK 150Mbps Nano, no additional driver needed and you almost don´t see it when it´s in the Rasbperry. With “ifconfig“, you can see if the WLAN stick is up and running with the correct driver:
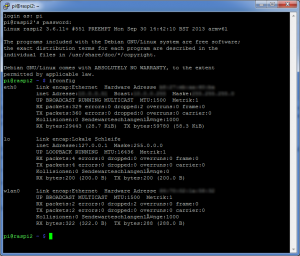
Bingo! “wlan0” shows up, so the WLAN stick should work. No IP address though.
Now i am a big fan of running the Raspberry “headless” (see Linux Basics), it should be even easier to start to the Raspbian GUI and change the WLAN settings in a cosy window. But hey, we want to do it right, so we are going to use SSH to connect to the Raspberry like a boss and change the settings directly in the interfaces file:
sudo nano /etc/network/interfaces
Raspberry Pi with Dynamic IP
This is usually the default setting, but every serious WLAN is secured with a key so you need to add that too:
auto wlan0
allow-hotplug wlan0
iface wlan0 inet dhcp
wpa-ap-scan 1
wpa-scan-ssid 1
wpa-ssid "WLAN_NAME"
wpa-psk "WLAN_KEY"
Now i don´t know what “wpa-ap-scan” and “wpa-scan-ssid” means in detail, but they do depend on the router settings. For example, the first one can be set to “2” for hidden networks (hidden broadcast). Just google for the parameters if they don´t work for you with those settings.
After you saved the changes, you need to start the interface with those settings:
sudo ifup wlan0
If it is already up and running, you need to bring it down first:
sudo ifdown wlan0
sudo ifup wlan0
If you call “ifconfig” again, you should see an IP address for the WLAN adapter too. If not, back to the settings file it is 🙂
Raspberry Pi with Static IP
A static IP is what i would recommend. It´s less resource hungry (no DHCP needed) and you always know the IP address of your device. There´s not much difference to the dynamic settings, you just have to specify the IP for the Raspberry Pi, the IP of the router (gateway) and the netmask (which will be the same in most cases):
auto wlan0
allow-hotplug wlan0
iface wlan0 inet static
address 192.168.0.10
netmask 255.255.255.0
gateway 192.168.0.1
wpa-ap-scan 1
wpa-scan-ssid 1
wpa-ssid "WLAN_NAME"
wpa-psk "WLAN_KEY"
If you want to go into details with netmasks and other stuff, just search for it. Plenty of resources about that on the internet, but you don´t really need to know to play with your Raspberry Pi 🙂
This helped immensely. Thanks!