After installing a Linux distribution as explained in my article “Raspberry Pi for n00bs – Installation“, it is time to change some basic settings. This article covers everything you need to know to get your system ready to use. I only run my Raspberries “headless”, without a monitor/TV. Saves an expensive gold-plated HDMI cable and all the cool kids do it 🙂
Connect to your Raspberry Pi
Before you can unleash the power of Linux, you have to connect to your precious Raspberry. Provided that you have activated SSH in the raspi-config tool and the Raspberry is powered and connected to your LAN, you can use a tool like Putty to open a connection. That is, if you are using Windows. Linux users can just use a Terminal, ssh is usually already installed. Either way, you need to know the IP address or the host name, which is “raspberrypi” by default.
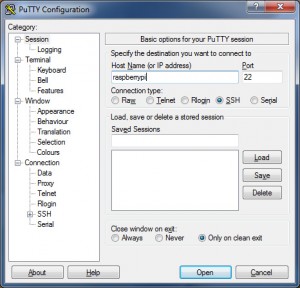
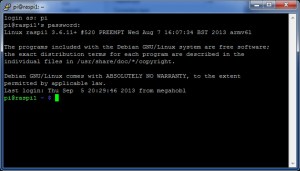
As you can see in the screenshot, just put in the host name and click “Open”. A Terminal window will open and you can log in. The default username is “pi”, the default password is “raspberry” (i´ve already renamed mine to “raspi1”):
Change Hostname and Password
You should change the default password asap, and probably your hostname too, especially if you plan to run more than one Raspberry in the same LAN. Use the following commands to change both:
#change password
passwd
#echo hostname
hostname
#open editor to change hostname
sudo nano /etc/hostname
#check if hostname is set correctly
cat /etc/hostname
#open editor to change hostname for 127.0.1.1
sudo nano /etc/hosts
#check if it was successful
cat /etc/hosts
#reboot
sudo reboot
For some commands you will need to use “sudo“, which runs a command in the context of another user (the root). “sudo” stands for “substitute user and do“. If you want to know more, the internet is full of excellent explanations for “su” and “sudo”.
I am using the editor “nano“. The commands are visible at the bottom, CTRL+O for saving the file, CTRL+X for closing it.
Change IP
By default, your Raspberry Pi should get his IP address with DHCP, while it is always better (and faster) to use a static one. We are going to need sudo for this one again:
sudo nano /etc/network/interfaces

#/etc/network/interfaces
iface eth0 inet static
address 10.0.0.40
netmask 255.255.255.0
gateway 10.0.0.1
nameserver 10.0.0.1

#stop and start network device
sudo ifdown eth0
sudo ifup eth0
“address” is the most important value in the file, gateway and nameserver will most likely be the IP of your router. “netmask” will be 255.255.255.0 in most cases, so don´t worry about that.
There is one problem: stopping the network device means that you cannot access your Raspberry anymore. I have used a WLAN stick while i set up my static IP for the LAN, that is why i was able to use “ifdown” and “ifup“. You can just call “sudo reboot” instead.
Fun with apt-get
“apt-get” (Advanced Packaging Tool) is where the installation magic happens. For example, if you would want to install “nano”, you would type the following command:
sudo apt-get -s install nano
sudo apt-get clean
The parameter “-s” means that it will only simulate the installation. It is good practice to call apt-get with the “clean” parameter after every installation, it removes downloaded installation packages.
Of course you can also deinstall packages with apt-get, or download packages without installation:
sudo apt-get remove nano
sudo apt-get download nano
Headless Linux
Now you are ready to go headless for real. You do not need to know all the packages, just use the following command to remove the graphical user interface completely. Be advised that it may take some time:
sudo apt-get -y purge xserver* x11-common x11-utils x11-xkb-utils x11-xserver-utils xarchiver xauth xkb-data console-setup xinit lightdm libx{composite,cb,cursor,damage,dmcp,ext,font,ft,i,inerama,kbfile,klavier,mu,pm,randr,render,res,t,xf86}* lxde* lx{input,menu-data,panel,polkit,randr,session,session-edit,shortcut,task,terminal} obconf openbox gtk* libgtk* alsa* python-pygame python-tk python3-tk scratch tsconf desktop-file-utils
sudo apt-get -y autoremove
sudo apt-get -y clean
The parameter “-y” means that every question that comes up in the process will get answered with “yes”. “autoremove” removes all unused dependencies.
Keep it up to date
You can easily keep your Raspberry on track with apt-get:
sudo apt-get -y update
sudo apt-get -y dist-upgrade
sudo apt-get -y autoremove
sudo apt-get -y clean
You can also use “upgrade” instead of “dist-upgrade”. The first one only upgrades existing packages, while “dist-upgrade” installs new packages or deletes old ones too. I am not sure if the comparison fits, but i would say that “upgrade” is like a patch in Windows, while “dist-upgrade” is an upgrade from one full Windows version to another.
Of course you don´t want to enter all those commands for the upgrade. Putty comes with a command line tool called “plink.exe”, which is perfect for a small batch file (“update_pi.bat”) to keep your Raspberry up to date:
c:
cd C:\Program Files (x86)\PuTTY
plink.exe -ssh rasperrypi -l pi -pw YourPassword sudo apt-get -y update
plink.exe -ssh rasperrypi -l pi -pw YourPassword sudo apt-get -y dist-upgrade
plink.exe -ssh rasperrypi -l pi -pw YourPassword sudo apt-get -y autoremove
plink.exe -ssh rasperrypi -l pi -pw YourPassword sudo apt-get -y clean
Even the login is included, so be careful where to place that file 😉
Sky is the limit
Here are some more Linux commands you may need:
#get kernel version
uname -a
#get firmware
sudo vcgencmd version
#get memory info (h - human readable)
free -h
#list disk space
df -h
#get cpu info
cat /proc/cpuinfo
#create folder
mkdir directory
#remove folder/file, including subfolders and files
rm -rf directory
#change directory
cd /absolutepath
cd relativepath
#move up one level, to the parent folder (mind the whitespace between "cd" and "..")
cd ..
I am no Linux king, so if you have any suggestions, please feel free to comment and stay tuned for more Raspberry Pi stuff 🙂